Pages

Monday, January 4, 2016

London through my lens


London city, during Christmas time, lits up in a way I have never seen any other city lit up. All the city streets will be adorned with amazing array of lights which will make anyone who comes here festive. Few pics taken during Christmas time this year and last year...

Soho, London
Carnaby Street, London
Winter Wonderland, Hyde Park

Angels Market, Hyde Park


Wednesday, January 30, 2013

Easy Chocolate Cake


There are times when you want to have something, there will be a tug of war between our emotional side and our reasoning side. For me, it happens on a daily basis. One such tug of war happened around 3 weeks back. I was really craving for a chocolate cake and I fell for it hands down..


Coming to the cake, I stumbled upon this recipe sometime back, when I was looking for an easy but moist, melt-in-your mouth chocolate cake. And I wanted to make a cake with available ingredients in my pantry. Tried for the first time as the recipe stated, it turned out really good and moist. Then modified the recipe to halve it, basically for my 8 inch pan. Later, I tweaked a little bit, like adding instant coffee powder  to give more depth of flavor. At times I add about 50 gm of milk chocolate chips too. It doesn't hurt to have more chocolate in a chocolate cake.


Easy Chocolate Cake
Recipe adapted from Cooks.com

1. All purpose flour – 1 cup
2. Sugar – 1 cup
3. Baking soda – 1 tsp
4. Baking powder – ½ tsp
5. Cocoa powder – ¾ cup
6. Instant coffee powder – 1 tsp
7. Salt – a pinch
8. Oil – ½ cup
9. Boiling water – ¾ cup
10. Full fat milk – ¾ cup
11. Egg,beaten - 1
12. Vanilla essence – 1 tsp

13. Milk chocolate chips - 50 gm; about a handful(Optional)

1. Preheat oven to 350F/180C for 10 min.
2. Grease and flour 8 inch cake pan.
3. Mix cocoa powder and instant coffee powder in a bowl and pour boiling water over the mix. If we are adding milk chocolate chips, add those to the mixture and mix thoroughly. Set aside to cool a bit.
4. Mix together beaten egg, milk, oil and vanilla essence in another bowl and set aside.
5. In a separate bowl whisk together the flour, sugar, baking soda, baking powder and salt thoroughly.
6. Into this, add the milk mixture and cocoa mixture and mix thoroughly. The batter now will be very runny.
7. Pour the mixture into the prepared pan and bake for 30-35 min or until a knife/toothpick inserted in the center comes out clean. Once done, remove from oven and allow to cool.
8. Dust with icing sugar or frost as desired.

Easy Chocolate Cake is ready to serve.

Notes to Remember
* Do not open the oven door for first 20 min. After 20 min, if the top of the cake is already browned(depends on ovens), can place a piece of aluminium foil on top of the pan to avoid excessive browning on the top.
* This cake will be super moist. So it wont be suitable for layered cakes.
* It is best to cut & eat the cake from the pan itself. But if we want to transfer the cake onto another plate,be sure that the cake is completely cooled and try inverting it slowly onto the plate. Otherwise the cake will break easily as it really moist. 
* The recipe calls for super fine sugar. If we are using regular sugar, just pulse the required amount in the grinder to get a finer texture.

Now, this recipe has become my GO-TO chocolate cake recipe. I'm sure there are lot of recipes for richer,more decadent chocolate cakes. But this recipe won my heart, since its the easiest chocolate cake I have ever made. 
And since Valentines Day is around the corner, what else could do justice other than a Chocolate cake.. So this one goes to all who will celebrate Valentines Day.. :-)


Tuesday, January 8, 2013

Badaam Milk


I first tasted badaam milk for a "nombu thurakkal" ceremony(Iftar ceremony) at our neighbour's place probably when I was 10 or 11 years old. It was so tasty that I drank up the entire glass in full gulp. It was a cold, refreshing drink. Even though I wanted a second helping, I was too embarrassed to ask, but our generous hosts gave me a second one. Later, when the recipe of the badaam milk came in Vanitha (our popular women's weekly), I remember memorising it, but never got a chance to actually making it. Years later, when I crave for badaam milk, I just humbly obliged to MTR badaam milk mix, even though the taste doesn't even get close to REAL one.(for me, the real badaam milk is still the neighbour's badaam milk)


But now things have changed. I make this drink every now and then. The REAL one was a cold drink and didn't have much graininess to it. But if I ran out of cheese cloth or if I'm pure lazy to strain it, I have it just like that. And it tastes as good as strained one.


Saffron infused Badaam Milk/Almond Milk

1. Almonds – about 25 no:
2. Full fat milk – 2 cups
4. Sugar – to taste
5. Saffron – a pinch

1. Soak almonds in hot water for about 15 min. Then peel off the skin and set aside.
2. Warm about ¼ cup of milk.
3. Combine almonds and warm milk in a grinder and grind it a very smooth paste.
4. In a heavy bottom saucepan, combine milk, sugar and saffron and bring it to a gentle boil while stirring continuously to prevent burning.
5. Once its about to boil, add the almond paste and stir continuously for about 5-7 min.
6. Take off from heat, strain the milk in a strainer and allow to come cool slightly.
7. Garnish with saffron strands.

Saffron infused Badaam Milk is ready to serve.

Notes to Remember
* Although we grind almonds to a very smooth paste,badaam milk still might have a grainy texture to it. If that suites the tastes buds, no need to strain the badaam milk. If we want to strain the milk,cheese cloth or muslin cloth is best.
* The above mentioned quantity of badaam milk serves 2 people.

So, I made this drink on New years day, marking this as my first post of this year..

Saturday, December 29, 2012

Special Carrot Cake & an Anniversary


Last week Danny & me celebrated our fifth wedding anniversary. Even though we knew each other for past 13 years, I still get goosebumps thinking about our wedding day. Like every anniversary, we like to celebrate it with some good home cooked dinner, a bake-from-scratch cake and occasionally a glass of wine, unlike going out to a restaurant.(Even though we never know when we will discontinue this tradition).And since this year was extra special for us(the reason to be revealed later), I thought baking a carrot cake would be perfect.

Well, you might think whats so special about carrot cake? Its just another ordinary cake. But when we have  memories attached to some things in life, it becomes extra special. I still remember, as a newly wed, standing next to a bakery counter in a local supermarket in US with Danny, awestruck with all these beautiful display of cakes and tarts. And when he asked me which one do we need to take home, I spend good 15 min deciding which cake to select :-) And then went for carrot cake. At home, while I was digging into the cake, still remember the rich sweet moist carrot cake in contrast with the tangy cream cheese frosting. That cake swept me off.

Once I started baking shortly after that, I tried different recipes for carrot cakes, like the Paula Deen's carrot cake with pineapple, shredded coconut etc and again Ina Gartens' carrot cake with raisins, brown sugar etc. But my favorite recipe of carrot cake comes from Joy of Baking because it's a simple,straightforward recipe. The best part of this recipe is that I could add the extra ingredients like crushed pineapple or coconut if I want to or keep it simple as it is. 


Special Carrot Cake
Recipe adapted from Joy of Baking

1. All purpose flour – 2 cups
2. Baking powder – 1 tsp
3.Baking soda – ½ tsp
4. Ground cinnamon – 1 tsp
5. Ground nutmeg – ½ tsp
6. Salt – ½ tsp
7. Sugar – 1 ½ cups
8. Oil(vegetable,sunflower or canola) – 1 cup
9. Eggs – 4
10. Finely grated carrot – 3 cups
11. Raisins – ½ cup
12. Walnuts or Cashewnuts – ½ cup
13. Vanilla Extract – 1 tsp

1. Preheat oven to 350F/180C
2. Butter two - 8 x 2 cake pans and line the bottoms of the pans with a circle of parchment paper.
3. Toast the cashewnuts or walnuts until lightly browned and fragrant. Let cool and then chop coarsely.
4. Peel and finely grate the carrots.
5. In a separate bowl whisk together the flour, baking soda, baking powder, salt,ground cinnamon and ground nutmeg.
6. In bowl of electric mixer (or with a hand mixer), beat the eggs until frothy (about 1 minute).
7. Gradually add the sugar and beat until the batter is thick and light colored (about 3 - 4 minutes).
8. Add the oil in a steady stream and then beat in the vanilla extract.
9. Add the flour mixture and beat just until incorporated.
10. With a large spatula/spoon fold in the grated carrots,chopped nuts and raisins.
11. Evenly divide the batter between the two prepared pans and bake 25 to 30 minutes or until a toothpick inserted in the center comes out clean.
12. Remove from oven and let cool on a wire rack. After about 5 -10 minutes invert the cakes onto the wire rack/plate.
13. If desired, frost the cake with cream cheese frosting.

Special Carrot Cake is ready to serve.

Notes to Remember
* Do not open the oven door for at least first 20 min.After 20 min, if the top of the cake is already browned(depends on oven), can place a piece of aluminium foil on top of the pan to avoid excessive browning on the top.
*We could bake this cake in a 9 x 13 x 2 inch (23 x 33 x 5 cm) pan. Just increase the baking time to between 30 to 40 minutes.
* This cake tastes best when eaten a day after its baked. Refrigerate any leftovers.


So for our Anniversary, I made Special Carrot Cake and my boy Aaron helped me, which made the whole process EXTRA SPECIAL.
This time I didn't frost the cake, rather, I made a small amount of cream cheese frosting and served it as side.It made my job easier and still we could have taste of tanginess and sweetness in every slice.Since I made very small amount of frosting with my own measurements, I am not posting the  recipe for frosting here. But we can get the recipe from here. This time I couldn't take many pictures of the cake.Next time I bake this cake, will sure post some more pics.

Wednesday, October 31, 2012

All-in-one Sponge cake


Sometimes, the best tasting cake will have the most simplest of the ingredients. My earliest memory of a cake will have to be the nicest aroma coming out of Amma's kitchen. She used to bake the simplest, yet the tastiest cake probably I have ever eaten, despite not having the electric mixer or high tech oven and such things. I remember patiently watching her beat and cream the butter and sugar, then adding eggs and then the flour to mix it together. And once the cake goes into the small oven we had, I was ready to lick the bowl, despite her no-nos..


Once I started baking, the first thing I made was my Amma's cake. And then ventured into all those fancy ones. But I still love and makes her cake the most. Lately, I started making my cakes in all -in -one  method rather than the creaming and folding method. I stumbled upon this method, one day when I was really craving for a home made cake, but didn't have any energy left to bake one. When I saw the recipe for this one, it was the same as mom's, that is equal amount of all the ingredients, but only difference was  that, in this method, we just mix it once for all, no creaming, no folding etc and just bake. And it seems(which I discovered lately) this is the basis of the most loved cakes of Britain, Victorian Sponge Cakes. 


Having said that, the most important rule to remember here is 
All ingredients must be at room temperature.


All-in-one Sponge Cake

1. Butter – 225 gm, plus for greasing the pan
2. All purpose flour – 225 gm, plus for dusting the pan
3. Baking powder – 1 tsp
4. Sugar – 225 gm
5. Eggs, medium – 4
6. Vanilla Essence – ½ tsp

1. Preheat the oven to 180C/350F
2. Grease and flour the baking pan. I used 8 inch square pan.
3. Sieve together flour, baking powder into a large mixing bowl.
4. Add eggs, sugar, butter , vanilla essence and beat everything together with an electric beater until its blended thoroughly and have smooth, well-combined mixture. This will take about one minute. If you don't have an electric whisk, you can use a wooden spoon with a little more effort.
5. Bake in the pre-heated oven for about 25 - 30 minutes or until well risen and a skewer/fork comes out clean.
6. Leave to cool in the pan for a few minutes then turn out, and finish cooling on a wire rack/plate

All-in-one Sponge Cake is ready to serve.

Notes to Remember
* Instead of greasing and dusting the pan,we can line the pan with parchment papers.
* For the quantity mentioned above, if we are using round pans, we require two 8 inch round pans. As a rule square pans holds more batter than round ones.
* Do not open the oven door for at least first 20 min.After 20 min, if the top of the cake is already brown(depends on ovens), can place a piece of aluminium foil on top of the pan to avoid excessive browning on the top.


In those early days with Aaron, with me running around in almost low energy mode, my instant perk me up was this cake, and it still is. Its simple, basic cake with no frills or fancies and yet the best tasting one, every single time.


Saturday, October 20, 2012

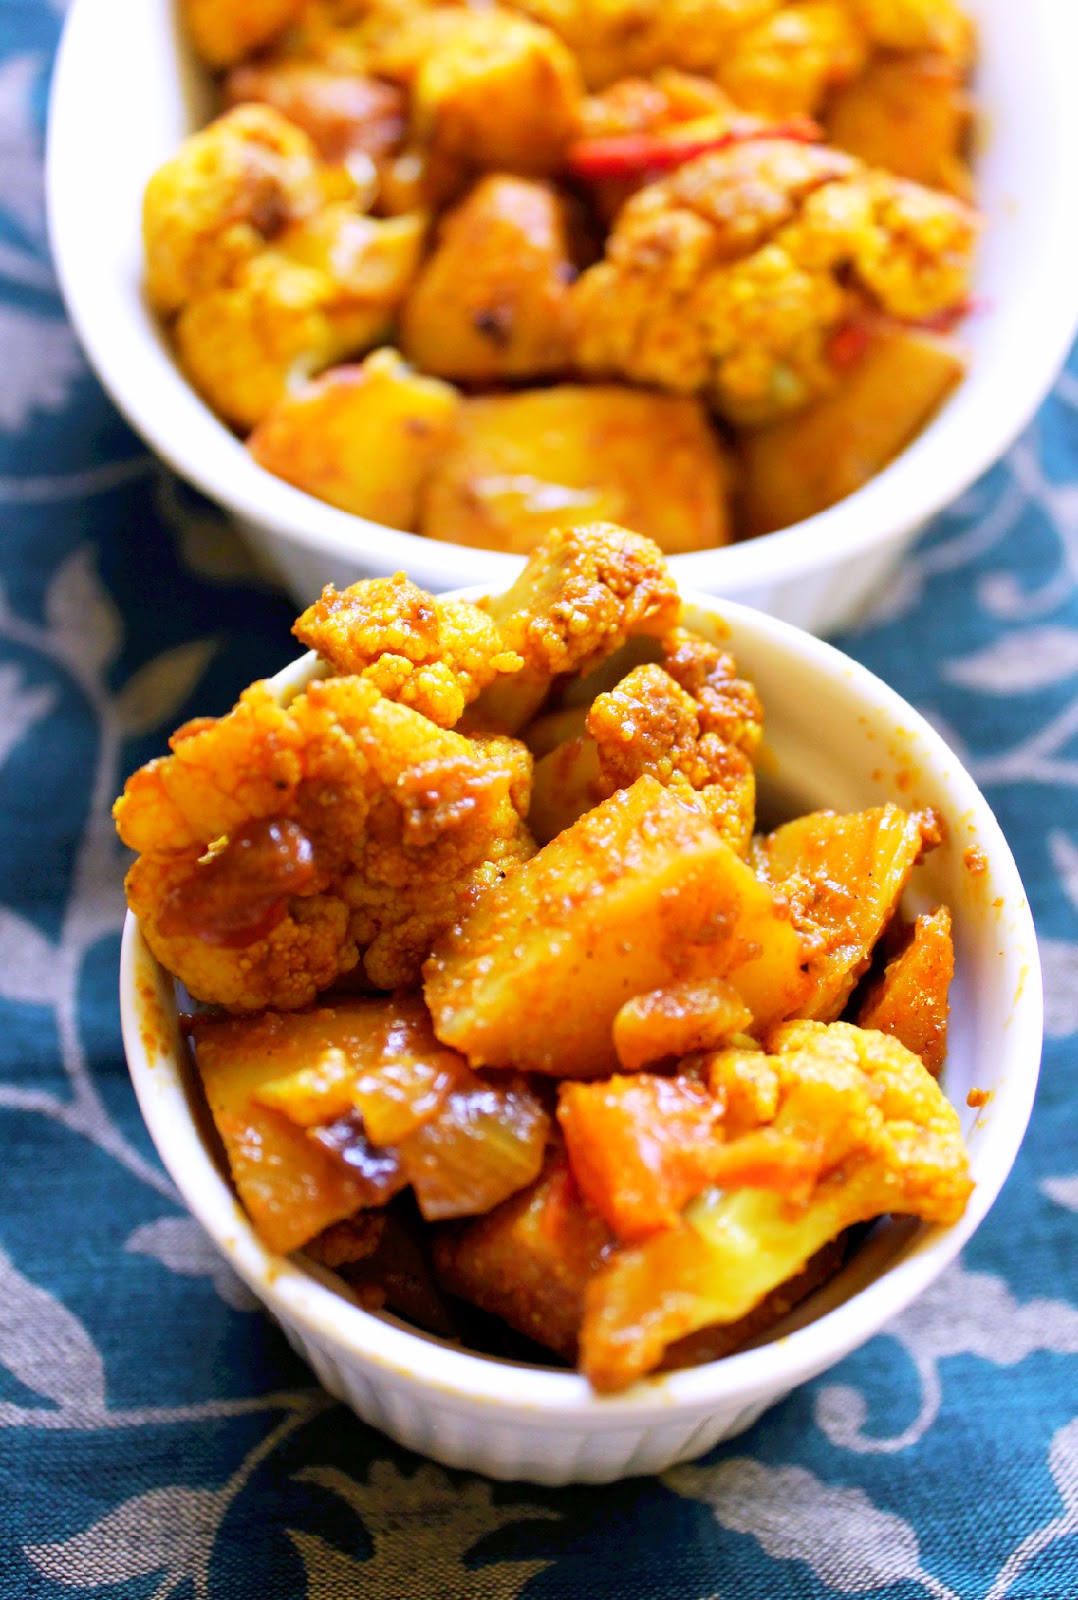
Baked Aloo Gobi (Baked Potatoes & Cauliflower)


Aloo Gobi, perhaps is the most popular dish of India. I guess its a staple of Indian, specifically north Indian cuisine. Originally hailing from Punjab, Aloo gobi gained international popularity ,thanks to Gurindar Chadda's film, Bend it like Beckham. Here in London, where Indian dishes and restaurants are popular,Aloo gobi is one of the most popular vegetarian dish.
Now, me being a South Indian, this dish was not a staple at my household. But whenever we used to go out to eat and rarely(since in calicut, famous for calicut biriyani,when going out, we never thought of going for a veg options)if we have to make a choice for north indian dishes, it was always paneer butter masala and aloo gobi


So when I tried to make aloo gobi at home, initial attempts were not that good. It was either soggy or way too oily. So i just dropped making it altogether. Its silly, to say, this dish being the most simplest one to make, somehow I never got it right. Then one day when we decided to make it AGAIN, Danny offered to help/improve this dish and we baked the veggies before sauteing it. And it was a tremendous improvement from earlier versions and since then we have been making baked aloo gobi regularly.


Baked Aloo Gobi/Baked Potatoes&Cauliflower

1. Potatoes – 4- 5 medium
to marinate with
      turmeric powder – ¼ tsp
      chilli powder – ½ tsp
      garam masala – ½ tbsp to 1 tbsp
      salt – to taste
     oil – approx 1-2 tbsp

2. Cauliflower – 1 medium head
to marinate with
      turmeric powder – ¼ tsp
       chilli powder – ½ tsp
      garam masala – ½ tbsp to 1 tbsp
      salt – to taste
      oil – approx 1-2 tbsp

2. Onion, finely chopped – 1 medium
3. Ginger, finely chopped – 1 tbsp
4. Garlic, finely chopped – 1 tbsp
5. Tomato, chopped – 1 medium
6. Green chilly, finely chopped – 1
7. Coriander leaves, finely chopped – small bunch
8. Cumin seeds – 1 tsp
9. Oil – about 1 tbsp

1. Preheat the oven to 200C/400 F.
2. Marinate potatoes and cauliflower separately with spice mixture for about 10 min.
3. Line two baking sheets with aluminium foil or grease paper.
4. Bake cauliflower for 15 -20 min until its done.
5, Bake potatoes for 20-25 min until its done.
6. Remove from oven and set aside.
7. Heat a saute pan over medium – high heat and once its hot add oil and cumin seeds.
8. When cumin splutters, add onions and saute it till its translucent.
9. Now add ginger, garlic, green chilly and saute for 5 more min.
10. Add tomatoes and saute till tomatoes are nicely cooked and mashed down.
11. Now add baked potatoes and cauliflower and mix well. 
12. At this point, if its too dry, add 1-2 tbsp of water to make it a bit soft.
13. Add coriander leaves, close the lid of the pan and keep for 5 more min on stove before setting aside.

Baked Aloo Gobi is ready to serve.

Notes to Remember
* Baked potatoes and cauliflower should be bit crispy outside and soft to bite.
* Adjust the green chilly to suit te individual spice levels.
* Adjust the salt again at the end of the preparation, if needed.


 That said, let me tell you , this is NOT the authentic/original way its been made. There are a lot of recipes for original versions, if we browse the Internet. But this is the way we love making it and now its going to be in my recipe book/blog.

Friday, October 12, 2012

Caramel Bread Pudding


Are you the one who always skips the first slice of the loaf of a bread, that thick crusty piece? If yes, then welcome to the club. Ever since I can remember I always ignore the first slice & the last slice of the loaf, to have the rest. And I always thought someone else would finish those slices.
But recently this has started to bother me, since I'm actually wasting food. And I don't like it at all, neither did Danny. Most of the times he is the one whose finishes those last slices, but at times when he doesn't bother to eat those, it just goes to waste. If at all I had any ideas to make use of those crusty slices.
And  then recently,while I was surfing through the TV Channels, I saw Nigella Lawson cooking up Caramel Croissant Pudding... 

Now talking about Nigella Lawson, she must be one of the best exports of Britain along with The Beetles, The Spice Girls, Bond Movies and all things British. I came to know about her cooking shows  recently while I was in India. And I was hooked. She makes us feel  that cooking is a really simple process,even thought its not.
So when I moved to US, after marriage, I tried looking for her episodes on food network channel. We had Paula Deen, Ina Garten and Guy Fiery, but no Nigella. I think the only time they aired her show was on Saturdays at 6 or 7 in the morning and I didn't want to lose my sleep for that. Anyways once we moved to UK, she was on almost all the food channels here.

 While Nigella made her pudding with croissant, I used leftover bread (read: slices which I never eat). I glammed  it up a little by toasting the slices with butter. Also I omitted adding bourbon(kind of liquor) since Aaron too will be having this. The end result was predictably good. (Obviously, with bread,butter,sugar,milk and eggs in a single recipe, it will never tastes bad, ever).


Caramel Bread Pudding
Recipe adapted from Nigella Express

1. Bread – approx 4-5 slices
2. Butter, room temperature - enough to spread on the slices and to butter the baking dish
3. Sugar - 100 gm
4. Water - 2 tbsp
5. Heavy/Double cream - 125 ml
6. Milk - 125 ml
7. Eggs,beaten - 2 medium

1. Preheat the oven to 180 C/350 F/gas mark 4.
2. Spread butter over both sides of bread slices.
3. Heat a pan and toast the bread slices, both sides till golden brown.
4. Tear the bread slices and put in a small glass dish of 500 ml capacity. I used 2 small oval baking dishes,of 250 ml capacity
5. Combine milk and cream in a saucepan and heat the mixture till it is just heated through.
6. Put the caster sugar and water into another saucepan, and swirl around to help dissolve the sugar before putting the saucepan or a small pot over a medium to high heat
7. Caramelize the sugar and water mixture by letting it bubble away until it all turns a deep amber colour; this will take 3-5 minutes. Don't stir at this stage since it may become lumpy.
8. Once its deep amber in color, turn heat down to very low and add the cream and milk and whisk continuously. Be very careful in this step since adding cream will make the entire caramel solution splatter.
9. Remove from heat and whisk further so that no lumps are remaining and keep aside to cool a bit.
10. Add this mixture to the beaten eggs.
11. Pour the caramel custard over the croissants and leave to absorb for 10 minutes.
12..Place the pudding in the oven for 20 minutes. Once done, allow to cool a bit, before serving.

Caramel Bread Pudding is ready to serve.
Depending on the appetite, one person can finish it off or can share it with upto 4 people.


Notes to Remember
* Always keep an eye over caramel all the time,otherwise it will burn in seconds.
* Be very careful while making the caramel and while pouring milk and cream to the caramel since it splatters very vigorously and may cause burns.


This pudding is one of those recipes, where your effort is really less, but pay off is huge. While I'm not bothered about the leftover bread once I tried this, I'm now bothered about the addictiveness to this pudding :-)

Thursday, October 4, 2012

Baked Sweet Potato Fries


Sweet Potatoes have become a staple in my home since my son started having solids. Before that, I didn't even turn my eyes on this root(tuber). But once he started having solids, tried mashed sweet potatoes and he loved it.. Since then it has always been in my grocery list, and also on his plate in different forms. Right now, his favorite form is fries, so that he can bite,chew and essentially play with it. 
This recipe is too easy to make. All I need is some essential ingredients  which I am sure to have in my  pantry. And I bake it since its more healthier and also faster to prepare. I try to vary the spices I put in the fries so that he doesn't get bored. And so far its working perfectly well.


Baked Sweet Potato Fries

1. Sweet Potato – 2 medium
2. Salt – to taste
3. Garam Masala – 1 tbsp
4. Oil – to drizzle (approx 1-2 tbsp)

1. Preheat the oven to 400 F/200 C.
2. Line a baking sheet with foil/grease paper.
3. Peel sweet potatoes and cut into wedges.
4. In a bowl mix sweet potatoes, salt ,garam masala and oil. Make sure all the pieces have been coated well.
5. Place the sweet potatoes in a single layer on the baking sheet and bake for 15  min.
6. After 15 min turn the sweet potatoes over and bake for another 5 min.
7. Once done, transfer to a bowl or plate. It should be crispy on outside,soft inside.

Baked Sweet potatoes fries are ready to serve. Either can have it as it is or with a dip.

Notes to Remember
* Make sure to check the sweet potatoes after first 15 min and if its not done ,bake for another 5 more min till its done.
* Depending on the size of sweet potatoes and individual spice level, can increase or decrease the amt of spices added. For me, it all depends what I feel at the moment.
* Oven temperatures might vary,so adjust the baking time accordingly.


And once I started making this, cant just stop eating it too. And sometimes if my boy doesn't eat it, I make sure that I finish all of it..


Wednesday, April 7, 2010

Almond Cake with Orange Marmalade

A year back, I made my first tart, Bakewell Tart. Everyone loved it especially the almond frangipane layer, which was almost like a sponge cake. I kept thinking about making the tart again, but then it didn't happen for a long time. Now when my friend Sobha's birthday came, I knew the time was right. But this time I didn't make the tart, but a cake made of the frangipane. And I'm calling it as Almond Cake. I even spread orange marmalade between the layers. And it was DELICIOUS ! :-)

Recipe inspired from Bakewell Tart

For the Cake:
Unsalted Butter - 250g
Icing Sugar - 250g
Eggs - 6
Ground Almonds - 250g
All purpose Flour - 60g
Vanilla Essence - 1 tsp
Orange Marmalade to spread between the cake layers

For the Icing:
Heavy whipping cream - 250 ml
Icing sugar - 2-3 tbsp
  • Pre-heat oven to 350 F.
  • Butter and flour two 9 inch round pans
  • Cream butter and sugar together for about a minute or until the mixture is pale yellow in colour and very fluffy. 
  • Scrape down the side of the bowl and add the eggs, one at a time, beating well after each addition. The batter may appear to curdle. 
  • Now add vanilla extract and mix for about another 30 seconds and scrape down the sides again. 
  • Spoon in the ground nuts and the flour to the mix.
  • Pour the mixture into the prepared pans and bake for about 30-40 min or until a toothpick inserted in the center of the cakes comes out clean. 
  •  Allow to cool.
  •  Whip the cream with the sugar until it's thick.
How to assemble:
  •  Place the first cake and spread Orange Marmalade.You can go as thick or thin as you want.
  • Place the second cake and spread the whipped cream over the cake.
  • Spread it evenly on top of the cake and also on the side.
  • Decorate with orange slices

Saturday, March 27, 2010

Orange Tian for Daring Baker's


The bitterness of winter is gone and flowers and blooming every where. Its' spring now. Let me bury the bitterness of  unfortunate events and carry forward to a new day. After all that's what life is all about. 


Being said that, Daring Bakers came at the right moment.And this time it was Orange Tian. What's a Tian? I have absolutely no idea what it is  but then this is what daring bakers is all about. Sure, its' all about Oranges, but its a unique dessert, a mix of citrus fruit with  whipped cream and crunchy cookie as a base. The first attempt on  my pate-sablee  (its more like cookies) was a disaster, it was too thick to be used as a base. Nevertheless it was a good snack. I had to re-do it and this time it was perfect.So here is my orange tian.


The 2010 March Daring Baker’s challenge was hosted by Jennifer of Chocolate Shavings. She chose Orange Tian as the challenge for this month, a dessert based on a recipe from Alain Ducasse’s Cooking School in Paris. 
This dessert consists of three layers(Pate Sablee with Orange Marmalade,Whipped cream, Orange segments)  and a caramel sauce.

Pate Sablee:
Egg yolks at room temperature - 2
Sugar  - 6 tablespoons + 1 teaspoon
Vanilla extract - ½ teaspoon
Unsalted butter - ¼ cup + 3 tablespoons
Salt - 1/3 teaspoon
All-purpose flour - 1.5 cup + 2 tablespoons
Baking powder -  1 teaspoon
  • Combine the flour, baking powder, ice cold cubed butter and salt so the butter should integrate into the flour
  • In a separate bowl, add the eggs yolks, vanilla extract and sugar and beat with a whisk until the mixture is pale. Pour the egg mixture in the flour mixture.
  • Process until the dough just comes together. If you find that the dough is still a little too crumbly to come together, add a couple drops of water and process again to form a homogenous ball of dough. Form into a disc, cover with plastic wrap and leave to rest in the fridge for 30 minutes.
  • Preheat your oven to 350 degree Fahrenheit.
  • Roll out the dough onto a lightly floured surface until you obtain a ¼ inch thick circle.
  • Using your cookie cutter, cut out circles of dough and place on a parchment (or silicone) lined baking sheet. Bake for 20 minutes or until the circles of dough are just golden.
Marmalade:
Freshly pressed orange juice -  ¼ cup + 3 tablespoons
1 large orange used to make orange slices
Cold water to cook the orange slices
Pectin - 5 grams
Sugar - Use the same weight as the weight of orange slices once they are cooked
  •  Finely slice the orange. Place the orange slices in a medium-sized pot filled with cold water. Simmer for about 10 minutes, discard the water, re-fill with cold water and blanch the oranges for another 10 minutes.
  • Blanch the orange slices 3 times. This process removes the bitterness from the orange peel, so it is essential to use a new batch of cold water every time when you blanch the slices.
  • Once blanched 3 times, drain the slices and let them cool.
  • Once they are cool enough to handle, finely mince them (using a knife or a food processor).
  • Weigh the slices and use the same amount of granulated sugar . If you don’t have a scale, you can place the slices in a cup measurer and use the same amount of sugar.
  • In a pot over medium heat, add the minced orange slices, the sugar you just weighed, the orange juice and the pectin. Cook until the mixture reaches a jam consistency (10-15 minutes).
  • Transfer to a bowl, cover with plastic wrap and put in the fridge.
Orange Segments:
For this step you will need 8 oranges.
Cut the oranges into segments over a shallow bowl and make sure to keep the juice. Add the segments to the bowl with the juice.

For the Caramel:
Sugar- 1 cup
Orange juice 1.5 cups + 2 tablespoons
  • Place the sugar in a pan on medium heat and begin heating it.
  • Once the sugar starts to bubble and foam, slowly add the orange juice. As soon as the mixture starts boiling, remove from the heat and pour half of the mixture over the orange segments.
  • Reserve the other half of the caramel mixture in a small bowl — you will use this later to spoon over the finished dessert. 
  • When the dessert is assembled and setting in the freezer, heat the kept caramel sauce in a small saucepan over low heat until it thickens and just coats the back of a spoon (about 10 minutes). You can then spoon it over the orange tians.
  • [Tip: Be very careful when making the caramel — if you have never made caramel before, I would suggest making this step while you don’t have to worry about anything else. Bubbling sugar is extremely, extremely hot, so make sure you have a bowl of ice cold water in the kitchen in case anyone gets burnt!]
Whipped Cream:
Heavy whipping cream - 1 cup
Hot water - 3 tablespoons
Gelatine - 1 tsp
Confectioner's sugar - 1 tablespoon
Orange marmalade (see recipe above)  - 1 tablespoon 
  • In a small bowl, add the gelatin and hot water, stirring well until the gelatin dissolves. Let the gelatine cool to room temperature while you make the whipped cream. 
  • Combine the cream in a chilled mixing bowl. Whip the cream using a hand mixer on low speed until the cream starts to thicken for about one minute. Add the confectioner sugar. Increase the speed to medium-high. 
  • Whip the cream until the beaters leave visible (but not lasting) trails in the cream, then add the cooled gelatine slowly while beating continuously. Continue whipping until the cream is light and fluffy and forms soft peaks. 
  • Transfer the whipped cream to a bowl and fold in the orange marmalade.
  • [Tip: Use an ice cold bowl to make the whipped cream in. You can do this by putting your mixing bowl, cream and beater in the fridge for 20 minutes prior to whipping the cream.]         


Assembling Orange tian
  • Make sure you have some room in your freezer. Ideally, you should be able to fit a small baking sheet or tray of desserts to set in the freezer.
  • Line a small tray or baking sheet with parchment paper or a silicone sheet. Lay out 6 cookie cutters onto the parchment paper/silicone.
  • Drain the orange segments on a kitchen towel.Have the marmalade, whipped cream and baked circles of dough ready to use.
  • Arrange the orange segments at the bottom of each cookie cutter. Make sure the segments all touch either and that there are no gaps. Make sure they fit snuggly and look pretty as they will end up being the top of the dessert. Arrange them as you would sliced apples when making an apple tart.
  • Once you have neatly arranged one layer of orange segments at the bottom of each cookie cutter, add a couple spoonfuls of whipped cream and gently spread it so that it fills the cookie cutter in an even layer. Leave about 1/4 inch at the top so there is room for dough circle.
  • Using a butter knife or small spoon, spread a small even layer of orange marmalade on each circle of dough.
  • Carefully place a circle of dough over each ring (the side of dough covered in marmalade should be the side touching the whipping cream). Gently press on the circle of dough to make sure the dessert is compact.
  • Place the desserts to set in the freezer to set for 10 minutes.
  • Using a small knife, gently go around the edges of the cookie cutter to make sure the dessert will be easy to unmold. 
  • Gently place your serving plate on top of a dessert (on top of the circle of dough) and turn the plate over. Gently remove the cookie cutter, add a spoonful of caramel sauce and serve immediately.

Saturday, January 9, 2010

Berries in a Pie


New year is a time to make a fresh start, do the undone and make things better. 2009 was a year of highs and lows for me in my culinary expeditions. Even though I discovered my passion for all things culinary, I let myself slip into monotonous life, doing the ordinary most of the time and being lazy too. 
Of course there were some highs, like learning the tricks of cake decorating which literally opened my mind to a new world,self- learning some techniques and for the first time I have started my own cookbook collection. 
So anyways this year I have made up  my mind not to let self-inhibitions take my culinary spirits away and never let any thing come in between me and my baking!! Period!!


I started off my new year with mixed berries pie. Yeah, it is not a berry season right now,but we always have strawberries or blackberries in our fridge. So why not make pie.I decided to make a lattice top for my pie. I have seen the lattice top in magazines and cookbooks, but haven't had the courage to try it. That's when I saw Elise Bauer's Simply Recipes which has an excellent step by step instructions on how to make a lattice top pie. It was like a photo diary that I never thought this was so easy and fun thing to do.


For the dough: 
Recipe adapted from Le Cordon Bleu's TheCooks Bible

All purpose flour - 200g
Cold Butter - 100 g
Salt - 1 tsp
Sugar - 1 tbsp
Egg - 1
Ice cold water - about 2 tsp

  • Sift the flour, salt and sugar. Cut butter into small chunks.
  • Rub in butter into the flour. Once done it should look like a course meal.
  • Add egg and enough water to make the dough (Note: I didn't use the water since adding egg itself gave the right consistency.)
  • Divide the dough into half, wrap and chill it for minimum of 30 min.

For the Berry Sauce:

Strawberries, hulled and halved - 1 cup
Blackberries - 1 cup
Sugar - 1/2 cup
Cornflour - 2 tbsp

  • Mix cornflour with desired amount of water to make a smooth paste.
  • Place strawberries,blackberries and sugar in a saucepan over medium heat.
  • Heat it for 5 minutes and then add cornflour mixture.
  • Cook, stirring, for 4 to 5 minutes or until mixture has thickened and heated through. Set aside.
How to make the pie:

  • Pre-heat the oven to 350 degree F .
  • Roll out half of the pie dough and lay it in the dish.
  • Using the back of the finger, press the dough into the dish. Trim the excess.
  • Roll out the remaining half of the pie dough and make the lattice top as demonstrated here
  •  Brush the top of the pie with egg wash (1 egg beaten with a small amount of water)
  • Bake the pie for 45 min to 1 hour and till the top becomes golden brown.
  • Allow it to cool completely before digging in.

Tuesday, September 29, 2009

Cranberry Orange Nut Cake


Few weeks back, while we were on a trip, I happened to eat an orange-cranberry muffin. I was awe-struck by the richness of the cranberry and the tanginess of the orange and yet the simplicity by which the two flavors merged. Once we were back, I decided to make it. I thought of making a cake rather than a muffin. Searched in internet and got one simple recipe. I tried it was a hit. I tried the second time,even more applause. So here goes the recipe..


Adapted from seasonal recipes website.
 
All-purpose flour - 1-1/2 cup

Butter, softened - 1 cup

Sugar - 1 cup
Eggs - 4

Baking powder - 2 tsp

Salt - 1/2 tsp

Vanilla extract - 1 tsp

Almond extract - 1 tsp

Milk - 1/3 cup

Cranberries halved - 2 cups
Almonds toasted - 1/2 cup
Grated zest of 1 orange
Icing sugar

  • Pre-heat oven to 300 F. Grease and flour a cake pan.
  • In a mixing bowl, combine the cranberries, almonds, orange zest and 1/2 cup flour. Set aside.
  • In a large mixing bowl, beat together butter and sugar until creamy. Beat in vanilla, almond, and eggs, one at a time. Set aside.
  • In another mixing bowl, stir together remaining flour, baking powder, and salt.
  • Add dry ingredients to creamed mixture alternately with milk, beginning and ending with the dry ingredients. Stir in cranberry mixture.
  • Bake for 55 to 65 minutes or until a toothpick inserted into the the center of the cake comes out clean.
  • Cool cake on a wire rack for 10 minutes, then turn out onto the rack to cool completely.
  • When completely cool, wrap cake in aluminum foil and store in a cool place for a few days to allow it to soften and the flavors to mingle.
  • Before serving, dust with icing sugar.
  • For best flavor, make this cake a few days before serving.

Sunday, September 27, 2009

Vols-au-Vent

The September 2009 Daring Bakers' challenge was hosted by Steph of A Whisk and a Spoon. She chose the French treat, Vols-au-Vent based on the Puff Pastry recipe by Michel Richard from the cookbook Baking With Julia by Dorie Greenspan.
 

This time, it was truly a challenge, since it was about making Puff pastry,something which i always ate, but never even thought of making it. So when it's time to make it, I plunged into it .
As always, my friends came along to help me and boy, it was fun. I made two savory filling - with chicken and tuna. But I have only tuna snaps to show you, since my chicken filled puffs finished as soon as I made.


Vols-au-vent


Ingredients


 Well-chilled puff pastry dough (recipe below) 


 Egg wash (1 egg or yolk beaten with a small amount of water)


Tuna salad filling (recipe below)


  • Line a baking sheet with parchment and set aside

  • Using a knife or metal bench scraper, divided your chilled puff pastry dough into three equal pieces. Work with one piece of the dough, and leave the rest wrapped and chilled.

  • On a lightly floured surface, roll the piece of dough into a rectangle about 1/8 to 1/4-inch (3-6 mm) thick. Transfer it to the baking sheet and refrigerate for about 10 minutes before proceeding with the cutting.

For smaller, hors d'oeuvre sized vols-au-vent, use a 1.5” round cutter to cut out 8-10 circles. For larger sized vols-au-vent, fit for a main course or dessert, use a 4” cutter to cut out about 4 circles.


  • Make clean, sharp cuts and try not to twist your cutters back and forth or drag your knife through the dough. Half of these rounds will be for the bases, and the other half will be for the sides.

  • Using a ¾-inch cutter for small vols-au-vent, or a 2- to 2.5-inch round cutter for large, cut centers from half of the rounds to make rings. These rings will become the sides of the vols-au-vent, while the solid disks will be the bottoms.

  • Dock the solid bottom rounds with a fork (prick them lightly, making sure not to go all the way through the pastry) and lightly brush them with egg wash.

  • Place the rings directly on top of the bottom rounds and very lightly press them to adhere. Brush the top rings lightly with egg wash, trying not to drip any down the sides (which may inhibit rise).

  • If you are using the little “caps,” dock and egg wash them as well.

  • Refrigerate the assembled vols-au-vent on the lined baking sheet while you pre-heat the oven to 400ºF (200ºC). (You could also cover and refrigerate them for a few hours at this point.)

  • Once the oven is heated, remove the sheet from the refrigerator and place a silicon baking mat or another sheet of parchment over top of the shells. This will help them rise evenly.

  • Bake the shells until they have risen and begin to brown, about 10-15 minutes depending on their size. Reduce the oven temperature to 350ºF (180ºC), and remove the silicon mat or parchment sheet from the top of the vols-au-vent.

  • If the centers have risen up inside the vols-au-vent, you can gently press them down. Continue baking (with no sheet on top) until the layers are golden, about 15-20 minutes more. (If you are baking the center “caps” they will likely be finished well ahead of the shells, so keep an eye on them and remove them from the oven when browned.)

  • Remove to a rack to cool. Cool to room temperature for tuna salad filling.

Puff Pastry Dough


Recipe adapted from Baking with Julia by Dorie Greenspan


Yield: 2-1/2 pounds dough


2-1/2 cups (12.2 oz/ 354 g) unbleached all-purpose flour


1-1/4 cups (5.0 oz/ 142 g) cake flour
1 tbsp. 


salt (you can cut this by half for a less salty dough or for sweet preparations)


1-1/4 cups (10 fl oz/ 300 ml) ice water


1 pound (16 oz/ 454 g) very cold unsalted butter

plus extra flour for dusting work surface


Mixing the Dough:


  • Put the all-purpose flour, cake flour, and salt in the work bowl of a food processor fitted with a metal blade and pulse a couple of times just to mix.

  • Add the water all at once, pulsing until the dough forms a ball on the blade. The dough will be very moist and pliable and will hold together when squeezed between your fingers.

  • Remove the dough from the machine, form it into a ball, with a small sharp knife, slash the top in a tic-tac-toe pattern. Wrap the dough in a damp towel and refrigerate for about 5 minutes.

  • Meanwhile, place the butter between 2 sheets of plastic wrap and beat it with a rolling pin until it flattens into a square that's about 1" thick. Take care that the butter remains cool and firm: if it has softened or become oily, chill it before continuing.

Incorporating the Butter:


  • Unwrap the dough and place it on a work surface dusted with all-purpose flour ( with your rolling pin, press on the dough to flatten it and then roll it into a 10" square.

  • Keep the top and bottom of the dough well floured to prevent sticking and lift the dough and move it around frequently.

  • Starting from the center of the square, roll out over each corner to create a thick center pad with "ears," or flaps.

  • Place the cold butter in the middle of the dough and fold the ears over the butter, stretching them as needed so that they overlap slightly and encase the butter completely. ou should now have a package that is 8" square.

To make great puff pastry, it is important to keep the dough cold at all times. There are specified times for chilling the dough, but if your room is warm, or you work slowly, or you find that for no particular reason the butter starts to ooze out of the pastry, cover the dough with plastic wrap and refrigerate it . You can stop at any point in the process and continue at your convenience or when the dough is properly chilled.


Making the Turns:


  • Gently but firmly press the rolling pin against the top and bottom edges of the square (this will help keep it square). Then, keeping the work surface and the top of the dough well floured to prevent sticking, roll the dough into a rectangle that is three times as long as the square you started with, about 24" .

  • With this first roll, it is particularly important that the butter be rolled evenly along the length and width of the rectangle; check when you start rolling that the butter is moving along well, and roll a bit harder or more evenly, if necessary, to get a smooth, even dough-butter sandwich

  • With a pastry brush, brush off the excess flour from the top of the dough, and fold the rectangle up from the bottom and down from the top in thirds, like a business letter, brushing off the excess flour. You have completed one turn.

  • Rotate the dough so that the closed fold is to your left, like the spine of a book. Repeat the rolling and folding process, rolling the dough to a length of 24" and then folding it in thirds. This is the second turn.

Chilling the Dough:


  • If the dough is still cool and no butter is oozing out, you can give the dough another two turns now. If the condition of the dough is iffy, wrap it in plastic wrap and refrigerate it for at least 30 minutes.

  • Each time you refrigerate the dough, mark the number of turns you've completed by indenting the dough with your fingertips. It is best to refrigerate the dough for 30 to 60 minutes between each set of two turns.

The total number of turns needed is six. If you prefer, you can give the dough just four turns now, chill it overnight, and do the last two turns the next day. Puff pastry is extremely flexible in this regard. However, no matter how you arrange your schedule, you should plan to chill the dough for at least an hour before cutting or shaping it. 


Tuna salad 

Canned Tuna - 1 small can  
Red onion - 1 small   
Garlic - 3-4 crushed   
Salt - to taste  
Pepper powder - to taste  
Mayonnaise - 1/2 cup


  • Drain the water from tuna.  

  • In a shallow pan, saute the onion and garlic. Add tuna, salt and pepper and heat it through.

  • Once done, remove from heat and let it cool. 

  • Once cooled, mix in mayo and chill it for atleast 30 min before serving.